Snaps with Eclipse Che Design
This post explains how “Snaps with Eclipse Che” works in detail; for a getting started guide see snaps-eclipse-che
Firstly the code works through an agent written in go that interacts with a bash script within the Eclipse Che Workspace Docker container. Other options would have been to write an Eclipse Che Extension written in Java, or to use the SSH Machine type built into Eclipse Che.
An external device (or snappy device) is needed, as currently Eclipse Che only supports hosting Docker containers. While snapcraft will happily run inside a Docker container, snapd will not, as it requires things like DBUS that don’t exist within the container. So while a snap could be generated and uploaded to store, it couldn’t be ran and tested.
Writing a Che Extension was decided against, as while it might be the best way workflow wise, allowing for custom IDE elements to be added, the Che interface is pretty complicated, and for the timescale of the project it would have been hard to complete, plus execute commands already in the IDE are sufficient.
Using the SSH Machine type requires the device to be publicly accessible. While fine for a server, for IoT or development on the go it would be annoying to need an open ssh port. This could be fixed by using some sort of reverse SSH, but that would require either running server to route connection (annoying requirement), or connecting directly to workspace machine. Given that the Eclipse Che REST Api includes a websocket based terminal anyway, that can be used as an easier way in.
So it was decided to have an agent running on the snappy device, and to use the Che REST api along with websockets for communication into the che workspace machine.
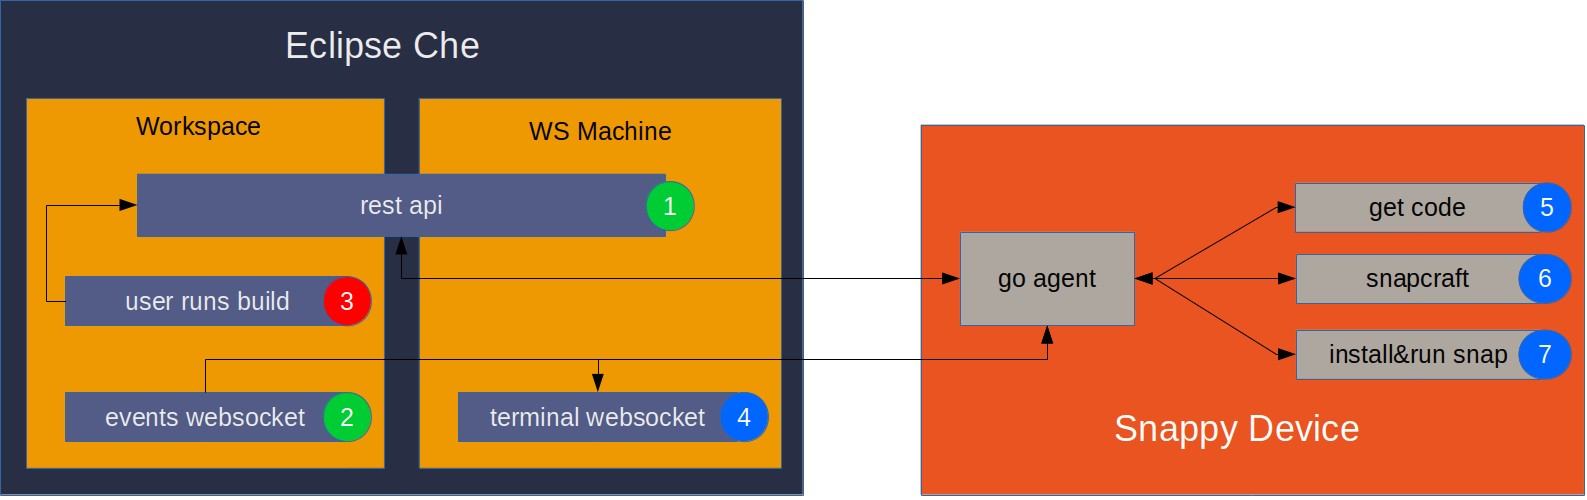
Run process
1-2: Initial connection and setup by snappy deviceza
3: Build kicked off by user within IDE
4-7: Running build on snappy device
- Agent connects to Che REST Api.
- Authenticates if needed
- Checks workspace still exists
- Waits until workspace is running (if suspended)
- Once running, gets info about projects and websocket links
- Adds execute commands if new project added
- Agent Connects to events websocket
- Subscribe to
machine:processchannel - Whenever process
STARTEDevent fired, run build
- Subscribe to
- User initiates build by clicking run command in Che IDE.
- script.sh file within workspace machine is called
bash /projects/script.sh- Random number chosen for port
- Project name, command (snap&run/snap&push) and port written to
/projects/lastcommand.txtfile - Listen on chosen port using netcat,
nc -l -u -p $port
- Agent connects to terminal websocket of workspace machine
- Runs
cat /projects/lastcommand.txtin terminal to get info from workspace about build - project
- command (snap&run/snap&push)
- port to send output on
- Runs
stty raw && nc -u localhost $portin terminal. Puts into raw mode and connects to Che Workspace terminal - stdout output from steps 4,5+6 are redirected into terminal websocket
- Runs
- Download code, currently pulled from git (not ideal)
rm -rf /tmp/$projectNamegit clone $repoLocation /tmp/$projectName
- Run snapcraft to create snap
- Install snap onto system and run
- Read snapcraft.yaml to find name of binary created to run
Custom Che Workspace
Eclipse Che allows you to provide a “recipe” to create a custom workspace, which is just a Docker file. File used is short. It takes the standard Eclipse Che docker image, and adds snapcraft, netcat, and a bash script.
FROM codenvy/ubuntu_jdk8

# Install snapcraft
RUN sudo apt-get update && \
sudo apt-get install snapcraft netcat -y

#Download script.sh file
RUN sudo wget https://raw.githubusercontent.com/Idealcoder/eclipse-che-snapcraft/master/script.sh -O /projects/script.sh
Bash script is saved to /projects/script.sh where it is called by the IDE whenever a build is set off. While it is possible to know when a build is started from the Che Events Websocket, there is no way to know what command was run and for what project, so the script handles that, writing it to a file, /projects/lastcommand.txt, which can then be read by the snappy device agent to find out what build command was executed.
The websocket terminal connection to the docker machine is a different terminal to the one opened by Eclipse Che when a command is executed. So, for output to be visible it needs to be sent across to a different terminal. Initially echoing line by line into a file and then tail -F was used as an initial solution. However this caused issues with extra lines as each time the terminal updates it is a new line. To fix this moved to using netcat. Che IDE terminal listens on an arbitrary port, and the agent websocket terminal connects with netcat and pipes in data. Strangely in Che WS Machine default TCP did not work, being blocked, however udp worked, so -u flag is used.
#!/bin/bash

#Choose random port number
port=$(( (RANDOM % 60000) + 1024 ))

echo "Starting build"

#Track last run command
echo "COMMAND:$1:$2:$port:" > /projects/lastcommand.txt

#Listen for terminal output
nc -l -u -p $port
# REST API
Authorisation is not always needed, e.g. when running Che locally on a machine. This is tested by attempting to list workspaces without being logged on, and if a 401 Unauthorized error code is sent then login is needed.
When listing workspaces, recipe URL used to create the workspace is included in information. By comparing this, snap workspaces can be determined. If there is only a single one, it is selected, otherwise user is prompted to select workspace to connect to. Also checked if workspace still exists, as user could have deleted it.
Eclipse Che has a system that when a workspace hasn’t been used, the workspace machine is shutdown to save resources. Code waits for workspace status to be RUNNING (polls api every 10 seconds), as before that point information such as workspace machine address cannot be known. This looped, so workspace can stop/start many times.
Once workspace is started up, api is used to get an array of projects within workspace (including their repo locations), address of Che Workspace Event websocket and WS Machine terminal websocket. This has to be done each time workspace starts up as it changes each time. Note that terminal websocket uses a different token to the normal authentication token. Commands are also added to IDE if a new project has been added.
Che Events Websocket
Address of events websocket is known from GET /api/workspace/{id} call earlier. Che uses wss://, or an encrypted websocket, which go agent opens using gorilla websocket library. However connecting so not enough, to receive messages you need to subscribe to a relevant channel. In this case, all we need is get a message when a command is executed in the Che IDE. There wasn’t much documentation about how the Che websockets worked, however they are the same ones used browser side by the IDE, so by watching the traffic on a browser the protocol could be understood.
{
  "uuid":"4B05BF83-A162-4B1A-B181-301FCF00CC61",
  "method":"POST",
  "path":null,
  "headers":[{
    "name":"x-everrest-websocket-message-type",
    "value":"subscribe-channel"
  }],
  "body":"{\"channel\":\"machine:process:$machine_id\"}"
}
Sending this message subscribes to the machine:process channel of the relevant machine. Then each time a build is started, this message is received. The important bit is eventType:STARTED in the body section. Whenever this is received, a build is ran in a go routine. Annoyingly the message doesn’t indicate which project, let alone command, was run. There might be another channel you can subscribe to get this, but I didn’t manage to find it.
{
	"headers": [{
		"name": "x-everrest-websocket-channel",
		"value": "machine:process:machinee83ffprwr86421zf"
	}, {
		"name": "x-everrest-websocket-message-type",
		"value": "none"
	}],
	"responseCode": 0,
	"body": "{\"machineId\":\"machinee83ffprwr86421zf\",\"eventType\":\"STARTED\",\"processId\":10942}"
}
Che Websocket Terminal
Each time a build is started, a websocket terminal into the WS Machine is opened. To connect, the address is known from when workspace information was collected. The token used is different to the authentication token, and is also gathered from the workspace information. Next this message has to be sent:
{
  "type":"resize",
  "data":[170,18]
}
No idea why. It may be to set the x/y size of terminal? Anyway sending this works. From then on to send any input to terminal this message is used, e.g. to run echo "Hello world!" on terminal. Any responses are just returned as raw text - no protocol at all.
{
  "type":"data",
  "data":"echo \"Hello world!\" \r \n"
This is cool as it allows everything to be done through Che without needing to worry about SSH. First command run in build process is cat /projects/lastcommand.txt, in order to find out which project, command, and port to use (written to earlier by script.sh in workspace). Agent waits for response before continuing.
Once the build starts on the snappy device, we need to connect to netcat listening on IDE terminal. Port number is known through lastcommand.txt, so following command sent: stty raw && nc -u localhost $portNumber \r\n. stty raw command means terminal passes through all raw command characters without interpreting, allowing things like carriage returns to work correctly. For some reason ANSI colour codes still don’t work, but everything else seems to.
Getting code
Currently code is downloaded simply by doing a git clone of code repository. The repo location is known from getting the workspace information. Done into /tmp folder as it is only needed temporarily in order to build snap. git clone $repoLocation /tmp/$projectName. This is not a great solution, as it only supports storing your code in a git repo (Che supports subversion as well), but requires you to check in your code every time you want to run your program, which is annoying as there is no way to test before you commit. In the future this is something that should be improved.
Running snapcraft
As long as snapcraft is installed, running snapcraft within project folder is all that is needed. Currently there is no caching. This means each build starts from scratch so takes a long time, so adding caching would be an improvement that could be added eventually.
Install snap on system and run
Installing snap on system is easy as it is just a case of running snap install *.snap within directory (cleaned each time, so will only ever contain a single snap file). This does need root privilege, so snappy device agent currently runs as root. This is bad security wise, so for a proper release this would have to be fixed.
Running the snap is slightly trickier, as you have to know what command to run. This is done by parsing the snapcraft.yaml file to find the name of the binary to run. Currently only runs main command, ignores any other sub-commands in snapcraft.yaml file. Perhaps in the future there could be a user override to specify which command to run, also allowing argument flags? Getting output from daemons is also not yet supported.
Conclusion
As you can see, there are still a couple of issues stopping it from working completely. However using the Che API to communicate totally works, and if it wasn’t for the work arounds like lastcommand.txt could be quite a nice solution. It shows the idea is feasible, and hopefully this write up explains how the code works.